How Arc Welding Works
Do you know the basics of Arc Welding, but struggle to get a campaign off the ground? This advanced guide will show you how to do that—fast.
Arc Welding can be broken down into four tasks:
1. The Welding Equipment
2. The Process
3. Arc Welding – Step by Step
4. Arc Welding Faults
5. Tips for better operation
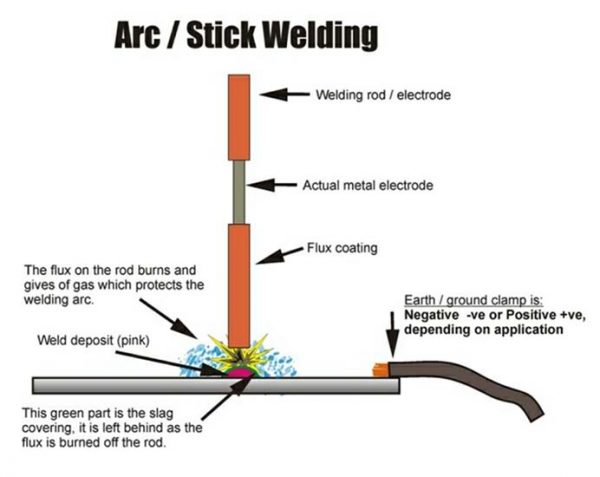
Arc welding is also known as stick welding (SMAW) or manual metal arc welding (MMAW) and is one of the most powerful ways to weld, suitable to major projects involving thick metals and windy or wet environments. The process basically involves electric current being passed through the rod, causing an electric arc to be formed at the tip of the welding rod in the air gap between the rod and the grounded metal you are working on.

The Welding Equipment
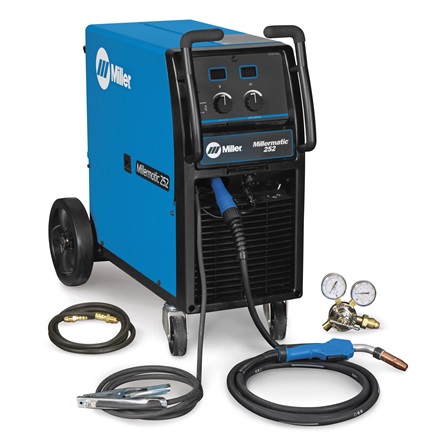
1. Welding machine
This is the machine that converts 240v of AC power into typical welding voltage, usually between 40 – 70v. The machine is made up of a heavy transformer, a cooling fan, voltage regulating unit and an amperage selector.
2. Welding leads
From the machine, the leads are thick insulated copper cable that carries the low voltage, high amperage electricity to the material that is being welded.
3. Rod holder
Sometimes called a ‘stinger’, this is the device at the end of the welding leads that holds the electrode, which is used to perform the welding task.
4. Ground / ground clamp
This lead attaches to the piece of material being welded to complete an electrical circuit and allows the current to pass through the material.
5. Electrode
There are a number of types of electrodes, which are specifically designed to work on different types of metals and alloys. A typical electrode is made up of the wire rod that is covered in flux, which burns as the arc maintains the current. For most uses, a general purpose electrode will be suitable but if you are unsure or are welding a particularly unusual piece of material, seek advice on the best type of electrode from a welding specialist shop.

The Process
Believe it or not, there is more to welding than simply dragging the rod across the metal and sticking the pieces together. In order to make a good, clean and reliable welding joint the pieces should be properly prepared and fitted before welding starts. Thicker pieces may need a bevel created so that additional welding beads can be placed in the groove for additional strength. The basic steps for creative a successful weld are as follows:
- Make the arc work for you – this is probably the most technically tricky part of welding, as you need to ensure you are creating an arc between the material and the electrode. If you are too close, the electric current will simply draw straight through your metal and fail to create enough heat to melt and join the metal together.
- Create a bead – By moving the arc around slightly you will notice a bead is formed by the melting electrode combined with the molten metal from your material. Your bead needs to be big enough to fill the space between the two pieces of metal you are welding.
- Shape the bead – By weaving the arc in either a figure of eight or a zig zag pattern around the bead you will be able to spread the metal join to cover the size and shape you need your finished weld to be.
- Remove the slag – As you weld, the flux melting from the electrode will leave a residue on the metal surface known as slag. Each time you pass over the weld with the arc you will need to remove the slag so that next time there is only clean, molten metal filling the weld.
Arc Welding – Step by Step
1. Gather your materials and tools
Welding machine, electrodes, cables, clamps, PPE equipment and metal to be welded
2. Set up a safe work area
Refer to the section on health and safety for advice
3. Prepare the metal to be welded
– As a minimum you should remove any grease, paint, rust or other contaminants from the metals.
– If you are joining two pieces together you may need to weld prep them by grinding a bevelled edge on the joining side to allow better penetration of the weld
4. Attach clamps to hold your metal pieces together
– C clamps, a vice or locking pliers are usually good for this
5. Attach the ground clamp to the largest piece of metal that is being welded
6. Select the correct rod and amperage range for the material you are working with
– This information can be freely found on the internet, but as an example, a 6mm piece of steel will be welded adequately with a 12mm electrode and at a range of 80 – 100 amps
– Place the electrode in the ‘stinger’ and make sure your stinger clamp is on clean metal at the electrode end
7. Turn on the welding machine – You should hear a humming from the transformer and the cooling fan may start to run
8. Hold the stinger in your right hand and prepare to strike the metal
– You may want to have a practice striking the metal with the machine turned off first so you get to experience the feel of it before working with it for real
9. Select the point where you wish to begin your weld
– Position your rod tip close to the point where you are going to start then pull your welding hood down to protect your eyes
10. Strike the electrode against the metal and pull back slightly when you see an arc
– This takes practice since different electrodes and amperages require different gaps to work effectively
– As a rule of thumb the gap should be no more than the diameter of the electrode
– The tricky part is holding the gap steady to maintain a constant arc as you move along the path of the weld
– The arc can be started using either a tapping movement on the base metal, or by ‘striking’ the electrode as if striking a match
11. Practice sweeping movements with the electrode to create a clean wide bead
– The cleaner the sweep, the more sound the weld will be
Arc Welding Faults
1.Arc Length Faults
Beginners will commonly have too long arc faults and too great a lead angle. Please note that an extreme rod lead angle will also increase the arc length.
- Arc Length Too Short
This weld was laid with the end of the rod covered by the molten slag. The surface of the weld is uneven where it has been dragged along by the rod, and the weld will be low on power and contain slag inclusions. - Arc Length Too Long
Too great a distance between the rod and the work will increase the voltage resulting in a flat and wide weld with a great deal of spatter. It also makes the arc unstable, and the slag will be difficult to remove from the edges of the weld. Sectioning this weld reveals undercutting to the left side.
2.Travel Speed Faults
Beginner welders tend to move the rod too quickly, especially those who are transitioning to arc welding from another welding process. The pool of molten slag is wide, tall and bubbly, and shouldn’t be mistaken for the weld pool!
- Speed Too Fast
Excessive speed results in a thin, weak bead. The ridges in the weld are elongated and triangular. Had the current been increased to compensate for the speed the ridges would still remain elongated. - Speed Too Slow
Welding too slowly results in a wide tall build up of weld. The shape of the weld is not consistent as the weld pool has built up and then collapsed into the crater. The poor control of the weld pool can result in cold joints and slag inclusions.
3.Current Setting Faults
Welding rod boxes are marked with their recommended current. Where in the range you work will depend on the position of the work, but for beginners setting the amps right in the middle of the range should rule out most faults due to incorrect amps.
- Amps too low
Setting the amps too low will result in a tall, narrow bead lacking in penetration. The weld will be difficult to start and the arc prone to straying towards one side of a joint in preference to the other. - Amps too high
The bead is wide, flat and irregular, and a small undercut can be seen on the right of the weld in the sectioned photo. A deep crater has formed at the end of the weld, and the slag is difficult to remove from the edges of the weld.
Excessive current should not be compensated by excessive travel speed. This can result in slag inclusions due to rapid cooling of the weld.
Tips for better operation
When you first start learning to weld, there is no doubt you will come up against the odd problem. The best advice is not to panic, and to give yourself time to think what to do next. Making snap judgements is a recipe for disaster, so slow down and look at the problem objectively. Here are some of the most common problems for new welders, and the action you can take to remedy them.
- If the electrode becomes stuck in the metal, pull back to break the rod free from the weld metal or the stinger clamp.
- If you break the arc because the electrode moves too far from the metal, stop the process and clean the surface slag before trying again.
- Never lay a bead over existing slag, this will cause a dirty and unreliable weld to be laid.
Get Notified of New Articles
Leave your email to get our weekly newsletter.


